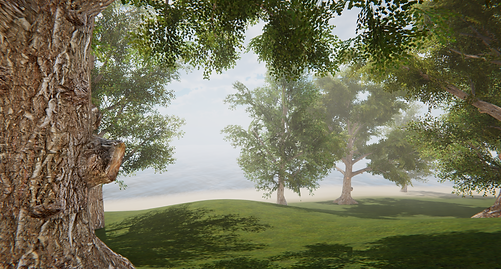
Creating an island

First, I used the terrain tool to create the landscape and the mountains.
Next, I painted on some materials and added some trees.
Then, I added some water that was provided in the standard assets pack.
After that, I added in a first-person camera that was also provided in the standard assets pack.
Finally, I added three more assets from the unity store. "Post Processing Stack", "Aura - Volumetric Lighting" and "Free HDR Sky".
Rubik cube
First I downloaded the assets that were provided. and imported them into unity. this included a 3d model of one of the blocks of a Rubik cube and the texture for the materials of it.

Next I replaced the materials that were originally applied to it to my own materials. This allowed me to add reflections to it to make it look like it is plastic.

I then set the snapping settings to 0.25 on the move X,Y and Z to make sure that it moved accurately.

Finally, I moved arranged the blocks in the shape of a rubik cube by duplicating it with "cmd - D" and then moving them while holding down "cmd".

Skybox
Procedural skybox
This is a sky that has been generated by unity. this allows you to have a lot of control over what the sky is going to look like.

Panoramic skybox
This is a 360 image that is being wrapped around the scene to create light. This is very quick and easy. It allows you to get good refections and lighting easily.

6 Sided skybox
This is similar to a panoramic sky however it acts as a cube around the whole scene instead of a sphere. This makes it more accurate. However, you need 6 images rather than one.

Scripts
This script is used to change the colour of the material while the game is playing.

Testing Materials in Unity
Glossy


To create a glossy material I had to change the smoothness to a higher value. I set it to 0.7.
Rough


To create a rough material I had to change the smoothness to a lower value. I set it to 0.1.
Metallic


To create a metallic material I had to change the metallic value from 0 - 1. I also set the smoothness to 0.7.
Glass


To create a glass material I had to change the rendering mode to transparent. I then changed the colour of the albedo and decreased the alpha value from 100 to 66. I also added a texture to the albedo to add some detail.
Lava


To create a lava material I had to put the connect the correct textures to the correct attributes.I used the height and normal map to make the texture look bumpy. I used the emission texture to make it look like it was glowing.
Unlit


To create an unlit material I had change the shader type from standard to unlit. Changed the colour to blue. this gave it the aperences that it was a silhouette because it does not interact with light.
Partical Systems in Unity
Fire
Step 1
First I created the material for the particles. I set the shader type to "Particles/ Standard Unlit". Then I set the rendering mode to Additive. Next, I added the texture that was provided to me to the albedo map.

Step 2
The second step was to add the material to the particle system.

Step 3
The third step was to set the start velocity to 0. This made the particles not move when the were created.

Step 4
The forth step was to change the force over life time values to the values below. I also had to change the space from local to world.

Step 5
The fifth step was to set the start size to 1 - 3. The made it so that every particle is a different size.

Step 6
The final step was to set the colour. I did this using the colour over life and setting the gradient. The bottom row of colours is the colour of the particles. The top row of colours is the opacity.

Snow
Step 1
The first step was to add a new material and set it to unlit and additive. Then I had to add the snow texture to it.

Step 2
The second step was to change the shape from "Cone" to "Box".
Step 2
The second step was to change the shape from "Cone" to "Box".

Step 3
The third step was to set the start speed to 0 and the gravity modifier to 0.9. I also changed the particle size to 10.

Step 4
The final step was to change the colour over time to make the snow get thiner over time.

Rainbow Trail
Step 1
The first step was to create a cube and then add a trail renderer modifier to it.

Step 2
The second step was to add a new material and set it to unlit and additive. Then I had to add the rainbow texture to it and add it to the particle system.
Particle Bunny
Step 1
The first step was to import the 3D model that was provided to me. This was a Bunny.
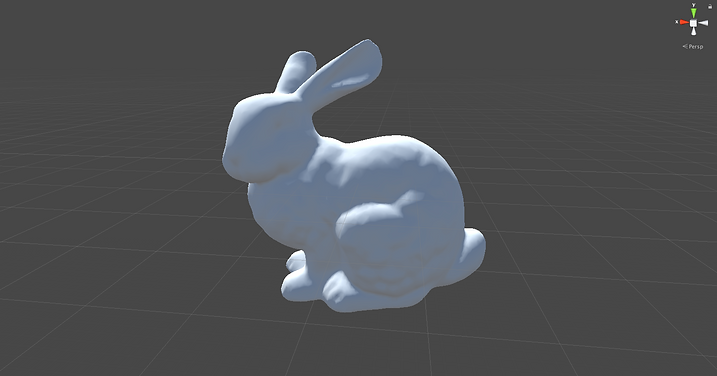
Step 2
The second step was to create a particle system and open the shape tab. I made sure that the shape was set to mesh and the mesh was the Bunny.

Step 3
The third step was to change the attributes of the particle system. I changed the start speed to 0 to make the particles stay still. I set the start size to random between two constants and set it to 7 - 1. This make the particles random in size but the biggest they could get was 7 and the smallest the could be is 1. I set the duration and start life time to 2 to make it so the particle will disappear after 2 seconds. I also set the gravity modifier to 0.01 to make the particles move up slowly.

Step 4
The forth step was to change the rate emission to 500. This made it so that the particles are created quicker.

Step 5
The fifth step was to create a material for the particles. I set the shader type to particles/ standard unlit. I then set the rendering mode to find and the colour mode to additive. I also applied the texture provided to the albedo texture. Next I applied the material to the particle system.

Step 6
The final step was to change the colour over lifetime so that it started transparent and the went opaque and then transparent again.

Scripting
Hello World!
This script is used to display the words "Hello World!" when the game starts.

my message
This script is used to display the what has been written in the string when game starts.

another message!
This script allows me to change what it says in the string by clicking on the cube and typing in what I want it to say.


My Name
This script allows my to click on the cube and ender my first and last name. who the game starts it will display it.


Procedural Art
Step 1
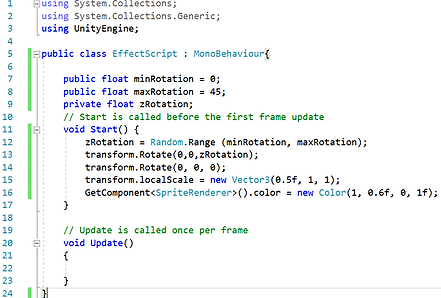
The first step was to import a sprite and add this script to it. This made the sprite rotate 45.

Step 2
The second step was to duplicate the sprite so that it was in a grid. The script transferred on to all of them and when I pressed play they all rotated 90 degrees.

Step 3
The third step was to add a variable called zRotation. This allowed me to chage wthe rotation by clicking on the sprite.


Step 4
The fourth step was to add another line of code that makes the rotation between 0 and 25 degrees. I also changed the zRotation variable to a private float because it is random.

Step 5
The fifth step was to add two more lines of code. They allowed me to control the minimum and maximum amounts of rotation.

Examples of different patterns


Stochastic Patterns
Step 1
The first step was to import two pattern textures as a sprite.

Step 2
The second step was to add this script to it. this made the sprite rotate by 90 degrees.
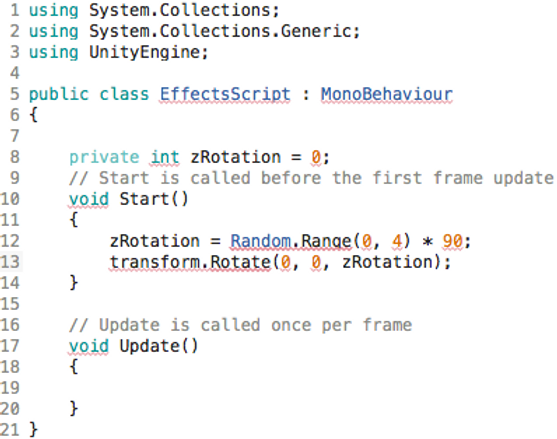
Step 3
The third step was to duplicate the sprite into a 9 x 7 grid. I also changed the sprite to the other texture that I was given. Every time a ran the script then it made new pattern.

Step 4
The forth step was to make the sprite change rotation every frame. these created a new pattern every frame.

Step 5
The final step was to make the sprite change rotation every second. I did this by adding delay to it.

Random Size
Step 1
The first step was to import the circle sprite and make it into a 25 x 11grid.
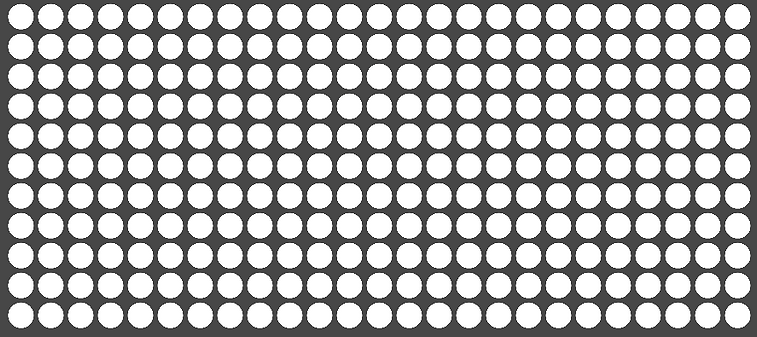
Step 2
The second step was to add this script to make the circles smaller.


Step 3
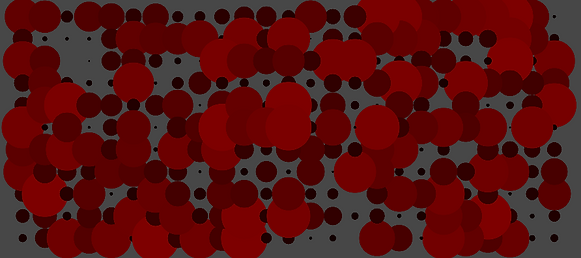
The third step was to add another line to the script to make the circles a random size in between 0 and 0.3.


Step 4
The forth step was to add another line to the script to change the colour of the circles. I also made it so that the size basin between 0 and 0.5.

Procedural Art with Trigonometry
Step 1
The first step was to import the square sprite and make it into a horizontal row. Then I added a script to it.

Step 2
The second step was to add two lines of code. This made the position of the squares to go up diagonally.


Step 3
The third step was to edit a line of code so instead of the squares moving up diagonally it will flow the cosine waveform.


Step 4
The forth step was to change the code so that it rotated the squares 10 degrees.


Step 5
The fifth step was to mess around with the code until I create a good looking pattern.


Underwater environment
Step 1
The first step was to import the assets that were provided to me.

Step 2
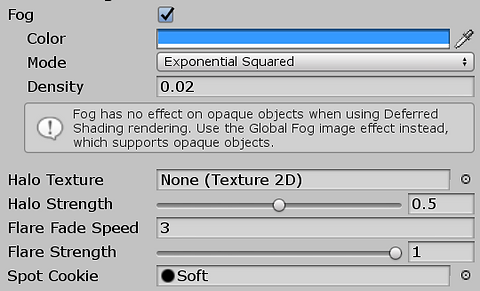
The second step was to import add some fog to the scene. I made the fog blue to make it look like it was underwater.

Step 3
The third step was to import and an add on called the "Post-Processing Stack". This allowed me to add certain effects to make it look a lot better.
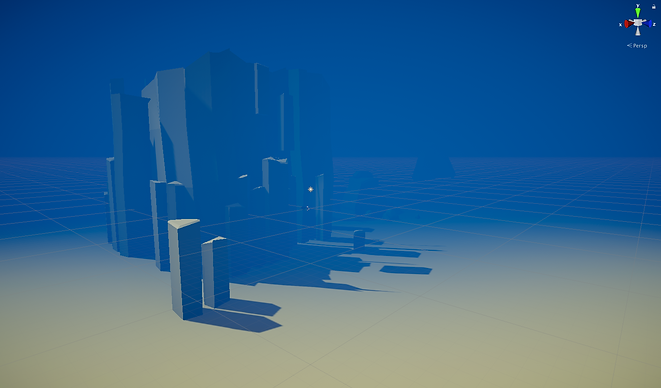

Step 4
The fourth step was to add a particle system to the rotor on the explorer. This made it so that it created bubbles when it was swimming around.


Step 5
The fifth step was to add a rock texture to the rocks. I used a texture from a website called Poliigon.

Step 6
The sixth step was to add a sand texture to the ground. I used another texture from Poliigon.


Step 7
The seventh step was to arrange the rocks in an aesthetically pleasing way. I also decided where I wanted the explorer to start.

Step 8
The eighth step was to add plants and seaweed to the sea floor. I changed the texture of the plants to another that I found on google.

Step 9
The final step was to duplicate the whole scene and rotate it 180 degrees and move it so that the scene is extended through the arch.

Sorting
First I imported all of the assets that were provided to me. When I combine all of the assets it created a picture, however some of the assets were underneath other when they shouldn't be.

Next I created sorting layers and put the correct assets into the correct layers.

Finally I had to change the order in layer attribute. This allowed me to put the layers in the correct order.

Final image

Y Sorting
First I imported all of the assets that were provided to me. I was provided with a bee that can move using the WASD keys and some bushes.

I then duplicated the bushes and arranged them so that they go up on the y-axis.
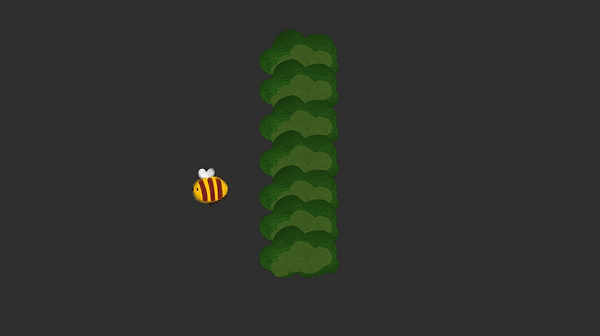
I then had to open the project settings and go under the graphics tab. I changed the transparency sorting to custom axis. I then set the Y parameter to 1.

Masking
I used the previous assets and arranged them like this.

I then added a sprite mask to the be and set the sprite to the bee sprite.

Next I set the map interaction of the right bush to "visible inside mask". This make the bush transparent until the bee flies over it.

Finally I set the map interaction of the left bush to "visible outside mask". This make the bush transparent when the bee flies over it.

Camera Settings
Don't clear
If you set the clear flags to don't clear then the last frame will not be removed and the new frame will be placed on top.
2 Cameras
I created a second camera and set the background to solid colour. Then I moved it down a little and when I pressed play I could see both of the cameras at the same time.

Culling mask
I then set the culling mask on the background camera to nothing. when I pressed play it took the objects from one camera and the background from the other camera.

Split screen
I deleted the existing cameras and created a new camera. I set the background to blue and then set the size to 0.5. I then duplicated the camera and change the background to orange and moved set the x value to 0.5.

Shader
Step 1
The first step was to import the 3D model that was provided to me. This was a Bunny. I also added a material to it and added a PBR graph to it.

Step 2
The second step was to create new colour node and connect it to the albedo channel.

Step 3
The third step was to right click on the node and click convert to property. This made it so that I could change the colour while the game is playing.

Step 4
The forth step was to change the material to transparent by clicking ton the gear icon. I then had to create split node and attached the property to it. I rthen connected the A value to the alpha channel. This made it so I could change the opacity of the shader using the alpha slider.

PBR vs Unlit
First I imported the 3D model that was provided to me. This was a Bunny. I also added a material to it and added a PBR graph to it and change the colour to blue
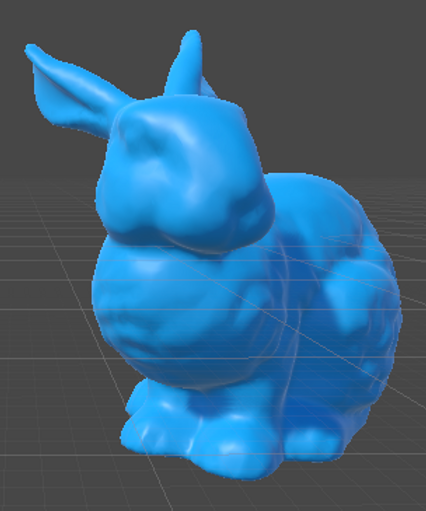

Next, duplicate the 3D model and move it next it. I then added a new material to it and created an unlit graph and change the colour to red.

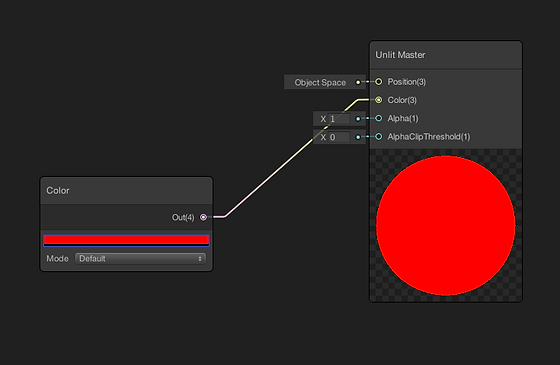
As you can see the PBR shader has shadows and reflections but the unlit shader is just a solid colour.

Mixing colours
First, I imported the bunny and added a new material and a PBR graph. I then created two colour nodes.

Next, I converted the two colour nodes into properties and put them into an "Add" node. I connected the "Add" node into the Albedo channel. This made it so the colour of the shader will be a mixture between the two colours.

Then, I replaced the add node with a multiply node. If I set the saturation of the second colour to 0 then I can use the second colour as a brightness controller.

After that, I replaced the multiply node with a lerp node and put a slider node into the third value. This allowed me to change how much the colours blend together.

Finally, I replaced the slider node with a split node and connected the green value to the lerp node. I then connected a position node to the sprite node and set it to object. This created a gradient between the two colours.


Textures
First I imported the 3D model that was provided to me. I also added a material to it and added a PBR graph.

Next, I added a "Texture 2D Asset" and a "Sample 2D Texture" and connected them to the Albedo channel.

I then converted the "Texture 2d Asset" node into a property. This made it so I could apply a texture to it in the viewport. However the texture only showed up on one side and there was not transparency.

So to fix this I connected the A on the "Sample Texture 2D" to the alpha channel. I so change the shader the to transparent and two sided and it fixed all of the problems.

After that I added a multiply node and combined the "Sample Texture 2D" and a colour node. I then made the texture green.

Next I connected the multiply node to another multiply node and connected that to the emission channel. I then attached a slider to the Multiply node to make the colour brighter.

I then added three nodes. "UV", "Split", "Combine", "Add" and "Time". I connected the "UV" node to the "split" node to separate the outputs. I connected the "G" value form the split node into the "combine" node and connected the "combine" node to the "Sample Textures 2D" UV channel. I connected the "R" value to the "B" value in the "Add" node and connected the "Add" node to the "combine" node. Finally, I connected a "Time" node to the "A" value on the "Add" node. The made the texture move on the X-axis.

Next, I added a "Multiply" node in between the "Add" and "Time" nodes. I also connected the sine time value instead of the normal time value. This made the grass texture move side to side. I made the effect weaker by setting the "B" channel on the "Multiply" node to 0.2 rather than 2.

After that, I added two more nodes. Another "UV" node and a "Lerp" node. I connected the "Lerp" node to the UV value on the "Sample Textures 2D" node. I then connected the "Combine" node to the "A" value and the "UV" node to the "B" value. I also connected the "G" value from the "Split" node to the "T" value. This made the bottom of the texture sway side to side but the top stayed still.

Finally, I added a "One Minus" node in between the "Split" node and the "Lerp" node. This inverted the swaying so that the bottom of the texture stayed still.

Final Result
Scripting
First I added a cube and added a script to it called "simpleOutput".

Then, I created an integer with my age in it and a string with my name in it. I also made it so when I press start it outputs them to the console.
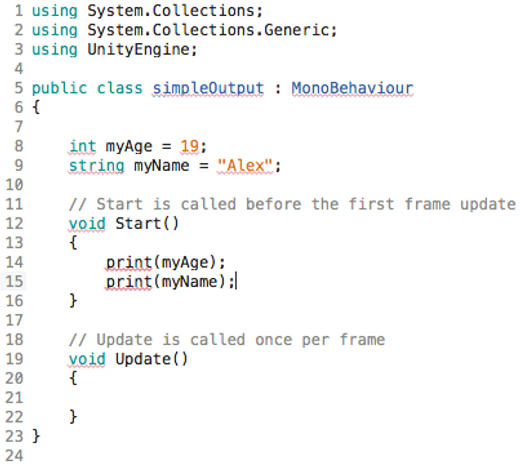

Next, I change the script so it didn't say my age anymore but it said "My name is Alex" instead. I did this by adding it to a void called "getInfo" and then outputting everything in that void.
After that I changed the script so it started with the number "1" and doubled it 10 times. It also outputted the all of the numbers into the console.


I then replaced the starting number with "0' instead of "1". I also changed it so it added 10 every time instead of doubling it.
Next I made it so that it outputted the year of every leap year for the next 5 leap years. I did this by setting the starting value to 2016. I also set it so it only added 4 instead of 10 and it did it 5 times.


Then, I changed the starting number to 900. I then made it divide by 3. I did this 5 times. This created an output of "300, 100, 33, 11, 3".
If Statements
First, I added a cube and added a C# script to it. I then added this script which was provided to me. This script allows me to enter a value for the speed and if it was "0" it would say "I'm not moving", if it was below "10" it would say "I'm walking" and if it was above "10" it would say "I'm running".


Then, I changed the script so you had to input your age and it would tell you what age group you would be. For example, someone who is 15 would be a teenager. I did this by creating more if statements for every category.
Next, I changed the script so you had to input two numbers and it would tell you which number was higher. It would also say if they were equal. I did this by creating one if statement if the first number was higher and one if statement if the second number was higher. I also create an else statement if to output that they are both the same.

Random numbers / Color

This script allowed me to generate a random number. I then converted the number to a colour, and then applied it to a cube. I then duplicated the cube to 9 and it gave all of them a random colour every time I ran the script.


Movement
First I used this script that was provided to me. This allowed me to move a cube left and right. I was also able to enter the speed that I wanted it to move.

I then edited the script to make the cube go up and down. I did this by adding two more if statements and setting them to the "up" and "down" keys. I also had to make it so it affected the Y - axis instead of the X - axis.


I duplicated the cube to make 3. Then I changed the speed value so it was different on all of them. This made them all move at different speeds.
Maze Game
First I created a 6x6 box using a stone sprite. I also added a box collider to it. I used the snapping tool to make sure it was accurate. I then added the player sprite and added a box collider and a rigidbody so it crashed into the walls. On the rigedbody I set the gravity scale to 0 and turned on the freeze rotation constraint. I added the movement script that I made previously to the player.

I then replaced one of the stone sprites with a door sprite and added a script and a box collision to it. The script will be used later to allow me to have to pick up the key first to open it.

Next, I added the key sprite and added this script to it. This allowed the player to pick up the key.

After that, I added this script to the door which allowed me to open the door.

So to fix it I had to add these lines of code to all three scripts. First I added a line to the player script to say weather the player has picked up the key. Then I had to change the two other scripts to react to what the player script says.


Next, I added the empty key sprite and added this script to it. This allowed the sprite to change to another when activated.

Finally, I added a line of code to the key script. This allowed the key to activate the previous script and change the empty key sprite.

Rotation and Position
First I used this script that was provided to me. This allowed me to move a car sprite around on the screen. This script had two values oin it, one for the speed and one for the angle. It then had two Ines of code that allowed me to control the car using the arrow keys using these values.

Next, I made a course for the car using a box sprite. I added a box collider to all of the boxes and the car. I also added a rigedbody to the car and set the gravity scale to 0.

Finally, I moved the camera closer to the car and copied the movement script from the car to the camera. This made the camera move with the car.
3 lane game
First I downloaded all of the assets that were provided and used them to make the main menu screen. I also added a box collider to the start sprite.

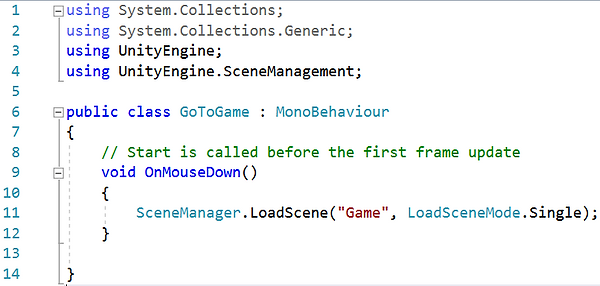
Then I created another scene called the game and I added this script to the start sprite. This made it so it switched to the game scene when I clicked start. To make this work I also had to change the build setting to include both scenes.
Next, I created the layout for the game. I used the same assets as them I used before. to create the menu.

After that, I added a box collider and a rigid body to the player. I checked the box that said "Is Trigger" on the box collider to make it so when something touches it, it will activate a command instead of them crashing into each other. On the rigidbody, I turned off the gravity. I then added this script to the player which allowed me to switch lanes using the arrow keys.

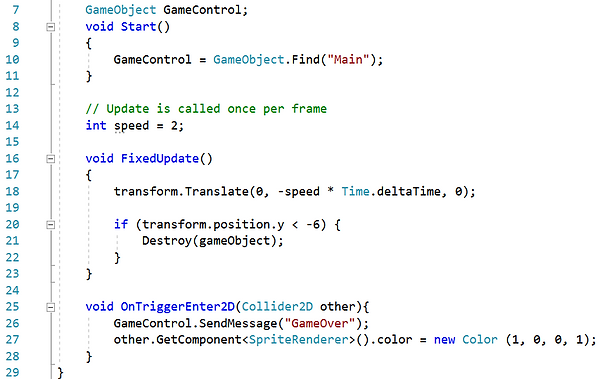
I then added this script to the enemy sprite. This made it move down the screen slowly and when it touched the player it made the player turn red.

Next, I created a cube and added this script to it. This made it so the enemies would keep on spawning in random lanes and the player would have to dodge them. However, there was no delay so there would be way too many of them.

To fix this I added these lines to the code. This created a delay between when the last enemy spawned and when the next one can.

I then wanted to make it so when the player died then they could restart the game. To do this had to change the script to have a game over function. I also had to change the update function.

Finally, I had to change the script so it would detect whether the player died and would then stop sending enemies.
